Quantcast
Channel: Condiments Archives - Our Best Bites
Viewing all 66 articles
Browse latest View live

Pepper Jelly Vinaigrette (& Salad)

$
0
0

pepper jelly dressings-9 square Once upon a time, I used to go to Costco and get the giant flats of strawberries and make freezers full of strawberry freezer jam. In the pectin box, there were recipes for other jams and jellies and I remember seeing pepper jelly. Being the Utah girl that I am (was? Do I still count as a Utah girl?), I had never heard of pepper jelly and it sounded horrific. I could not imagine a world in which eating pepper jelly would be okay, or how you’d eat it, or why you would ever want to eat it. Peanut butter and pepper jelly sandwiches? Pepper jelly on toast or waffles? No. Just no.

And then I moved to Louisiana and overcame my fear of spiders (there are bigger, badder critters that need to die…spiders are pretty low on my list), learned that “bless your heart” is almost never nice, and that pepper jelly is amazing.

Just to be clear, pepper jelly isn’t really for toast. Or peanut butter. I dunno, maybe it is for some people (bless their hearts), but the only times I’ve ever used or been served pepper jelly, it’s been in conjunction with something savory; the pepper jelly is sweet and spicy, so I’ve seen it in sauces and stir fries and served with cheeses (like this baked brie).

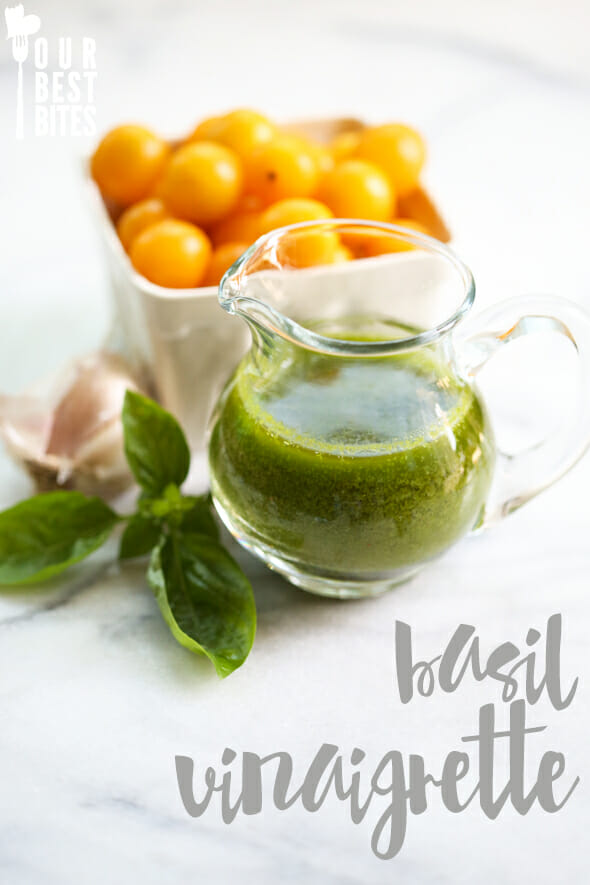
I recently went to dinner here with some friends and there was a salad with pepper jelly vinaigrette. The salad itself sounded good, but the resounding recommendation from everyone was no matter what I got, the pepper jelly vinaigrette would make it all worth it. And they were right–it was tangy and sweet and spicy, but not so spicy I couldn’t enjoy it–the perfect complement for the chicken and the salty feta crumbles and the sweet oranges.

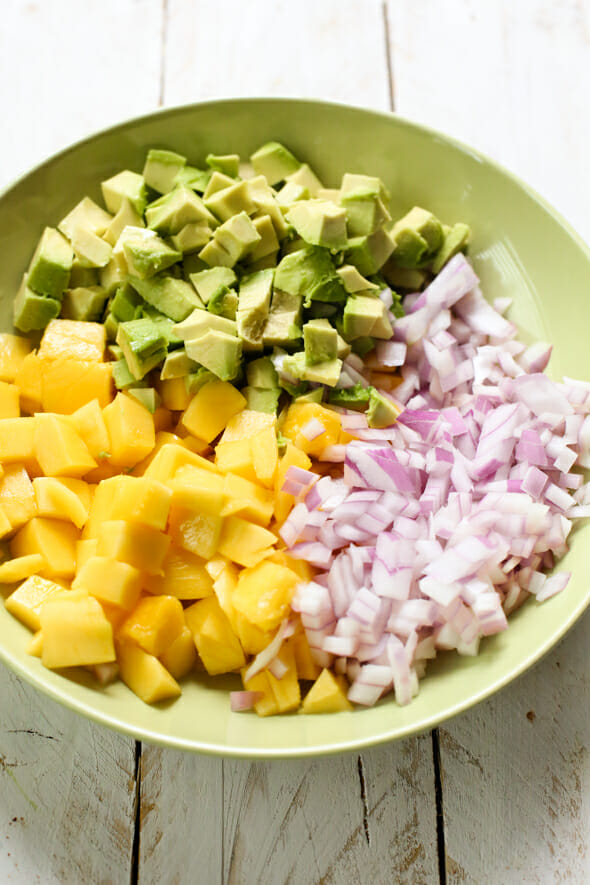
I tweaked the salad a little at home–I added avocados and onions because the whole time, I kept thinking that onions were the one thing missing. I also added fresh oranges instead of Mandarin oranges because, you know, I’m so fancy.

For the dressing, the main thing  you’re going to need is pepper jelly. Now…I know pepper jelly may be hard to find if you don’t live in the land of pepper jelly. I used Tabasco pepper jelly here because it’s a national brand and you’re probably most likely to find this in your regular grocery store.

tabasco pepper jelly 
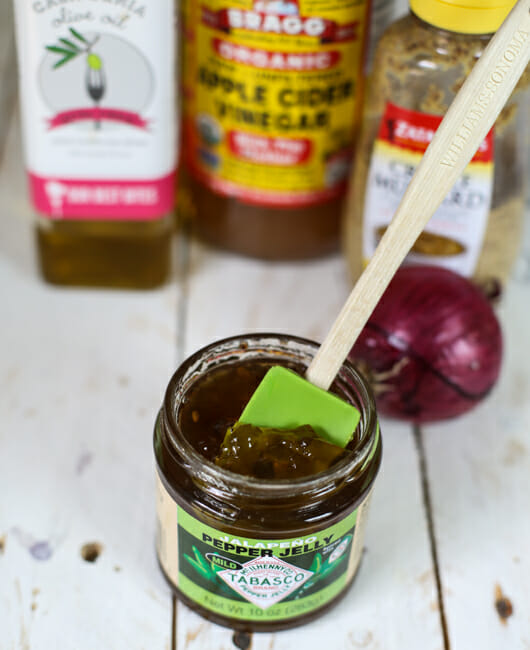
That said, it wasn’t my favorite. I’ve tried other brands (from the grocery store) as well as homemade jellies (or jellies from farmer’s markets) that I like better. But. If all else fails, there’s Tabasco.

If you have a World Market, Trader Joe’s, Whole Foods, etc., you’re very likely to find good brands there.

My favorites have probably come from local farmer’s markets, so if farmer’s markets are your thing, you might get lucky and find pepper jelly there (I had apple pepper jelly once that was pretty much one of the most delicious things I’d ever eaten.)

The other option is to make your own. Be a pepper jelly-making pioneer. Share the good news of pepper jelly with those who may not yet understand.

ANYWAY.

You’ll need pepper jelly. And apple cider vinegar (Bragg’s, if you can find it), a little Creole mustard (Walmart makes a great house brand called Great Value Coarse Grain Mustard), salt, pepper, garlic, a little onion, and some extra-virgin olive oil.

pepper jelly vinaigrette ingredients

Place all the ingredients except the oil in the jar of a blender. Blend until smooth. While the blender is running, add the oil in a steady stream. Allow to stand for at least 1 hour before serving.

Pepper Jelly Vinaigrette from Our Best Bites

Now…to re-create the salad I had, you’ll need a plate of this…

plate of spinach

And then top it with some of these:

red onions and spinach

and then some of these…

oranges, spinach, and onions

and these:

pepper jelly dressings-20 copy

and some of these.

pepper jelly dressings-21 copy

Sprinkle it with some feta…

pepper jelly vinaigrette spinach salad from Our Best Bites

Drizzle it with dressing and eat up right away!

Pepper Jelly Vinaigrette Spinach Salad from Our Best Bites


It’s Ice Cream Weekend for your Boise-Area peeps!  Swing by one of the following locations to say hi to Sara and have a taste of her yummy new Ice Cream flavor, sold in Kroger family stores!

Private Selection Tastings

The post Pepper Jelly Vinaigrette (& Salad) appeared first on Our Best Bites.


Blackberry-Mint Syrup

$
0
0

blackberry mint syrup-5 copy 2 I have this weird thing about berries. It’s complicated, way too complicated to write out in great detail, but suffice it to say that the berries I like to eat by themselves are rarely the berries I like in stuff and vice versa. I would also rather die than eat raspberry-flavored anything, like candy.

So when it comes to blackberries, I don’t really like to just, say, pop a blackberry into my mouth. Too spiny and seedy and bitter. But in stuff? And blackberry-flavored stuff? My favorite. Like…all-time favorite.  Blackberry Italian Sodas…blackberry ice cream…any time I get frozen yogurt, forget all the many, many flavors of yogurt and the candy bar chunks and the brownies and the gummy bears–I always, always get the tart frozen yogurt with kiwi chunks and big, fat, juicy blackberries.

Since it’s blackberry season, I’m seeing all sorts of Facebook and Instagram posts about people going blackberry picking with their kids. I also totally took my kids blackberry picking. And by picking, I mean picking out blackberries at the grocery store that are on sale for a reasonable price, then paying for them with a debit card at the self checkout line. We needed more blackberries in our lives. In the form of blackberry syrup, because, you know, syrup.

You’re going to need about 3 cups of blackberries and some fresh mint.

blackberry mint syrup ingredients

If mint is not your thing, you can leave it out. Mint is my thing.

mint leaves

You’re also going to need some sugar and a lime, but they didn’t make the picture, soooo…

Anyway.

Place the blackberries and mint leaves in a medium saucepan

blackberries and mint

and sprinkle with the sugar.

adding sugar to mint and blackberries

Cook over medium heat, stirring frequently, and squishing the berries against the side of the pan as they cook to help release the juices, for about 10-15 minutes or until the berries are significantly broken down. Remove from heat.

Using an immersion blender (or a regular blender), blend until the berries are puréed. Now. There will be a lot of pulp–it’s just how things are. I don’t mind it–I’m a heavy pulp in my orange juice kind of girl. But if you prefer a smoother sauce, you can push things through a fine mesh strainer. I would recommend re-adding about half of the pulp, and, if necessary, returning the mixture back to the pan, reheating, and adding a tablespoon of cornstarch mixed with a tablespoon of cold water and stirring until it’s thickened. If you remove ALL the pulp, it will be thin like juice and you’ll have significantly less syrup to work with, but it’s just a matter of personal preference.

So now that I’m done over-explaining, add the lime juice and salt.

Blackberry Mint Syrup from Our Best Bites

You can refrigerate this for up to a week or freeze for several months.

Blackberry Mint Syrup from Our Best Bites


The post Blackberry-Mint Syrup appeared first on Our Best Bites.

Frozen Herb Starters

$
0
0

Fresh Herbs intro Fresh herbs are one of my favorite things about having a home garden, but they’re also one of the hardest things for me to keep up with.  They need quite a bit of trimming and pinching back to really stay viable and they can get out of control really quickly.  I use a lot of fresh herbs in my cooking, and I still can’t keep up with my own plants.  I started making these little frozen herb cubes years ago, (long before the idea went viral on Pinterest!) and thought it was about time I shared it here because it’s a great way to preserve the fresh flavors of summer and then enjoy them all year long in lots of different recipes.  It’s so quick and easy, you can feel really productive with your preserving skills.  And I’m all about easy things that make me feel productive!

Fresh Herbs
I’ve always used ice cube trays to make these, or these silicone baking trays (which work, but they’re floppy, so you need to set them in a larger pan and then place it in the freezer.  They also have rather small capacity per square).  A few weeks ago I ran to the store to stock up on more ice cube trays and ironically, they were on the same aisle as the canning and preserving stuff and I noticed these Frozen Herb Starter Trays.  I had no idea they even made these, so I bought some and they work awesome.  I love how deep the squares are, the silicone makes it so they pop out really easily, and I like that they have a lid.  You can order them on Amazon, or just use a ice cube tray lined in plastic wrap for this recipe.

Frozen herb starter Tray

Start with any herb, or combination of herbs you like.  Make sure they’re washed and cleaned, and then snip them up.  I tend to use the same combo in most of my recipes, so I just mixed fresh basil, oregano, and rosemary together.

Chopped Herbs

You can use herbs alone, or add other flavor components.  My favorite combination with fresh herbs is garlic and lemon, so I’m adding fresh minced garlic, and some fresh zest from the lemon.

Lemon and Garlic

You can actually stuff quite a large quantity of herbs into a small space, so you can make these as full as you like.  Just remember that 1 teaspoon of a dried herb equals 1 tablespoon of the fresh one, so you can go heavy handed on the fresh when you think about using them in your favorite recipes.  They’re not as strong as dried herbs.  I just toss in a little garlic and lemon right on top.

Filled Up Herb Starters

The next step is to encase the herbs in a cooking liquid, and you can use one of 4 things.  Aside from water, you can use broth, melted butter, or olive oil.  All of them work well, and are well suited for different purposes when they’re all finished.

Frozen Herb Starters Fillers

After your cubes are filled, add in your desired liquid  You don’t have to be adding copious amounts of butter or oil.  If you stuff the cubes with herbs and flavorings, you really only need a couple of teaspoons of liquid, which is a great amount for most recipes.

Frozen Herb Starters Filling with Butter

I’m using our Rosemary olive oil in this batch.  Kate and I have mentioned that of all of our specialty oils, the rosemary is our favorite.  I’m pretty sure we could both drink shots of it, but don’t tell anyone that.  This flavor used to only be available in our Flavor Variety Pack, but we currently have larger bottles in stock that you can buy on their own.  Grab some before they’re gone!

Frozen Herb Starters Filling with Rosemary Oil

Pretty much ANY of our olive oils would be amazing in these cubes; this is a perfect use for them, easily adding a burst of flavor to your cooking.  Basil and Rosemary are obvious choices, for their herby-ness, but try chili for a little kick, or lemon for a hint of brightness or garlic for deep flavor even without the added fresh garlic.  Bacon would even work here with the right combo.

Our Best Bites Olive Oil Flavors

Pour a little in, and then gently press herbs down so they’re all submerged.

Frozen Herb Starters Filled with Oil

After freezing you can pop them in freezer containers or bags,

Frozen Herb Starters

and them use them straight from the freezer for fresh herb flavor all year long.

Frozen Herb Recipe Starters  from Our Best Bites

Some of my favorite uses:

- Melt a cube in a saute pan before scrambling eggs or making an omelet
- Use them to saute fresh vegetables
- Rub on top of hot corn on the cob
- Slice pats on top of grilled steak
- Saute chicken or fish on the stovetop
- Drop in a pot of homemade soup
- Add to pasta sauces
- Toss a couple with fresh hot pasta or ravioli
- Soften and spread on french bread and broil until golden brown


If you’re a fan of canning and preserving, then make a note that this Saturday August 16, Jarden Home Brands (Ball brand) will host the first annual International Can-It-Forward Day.  You can connect via a variety of online and in-person activities, including participation in a live webcast on www.frespreserving.com, taking place on ground in Brooklyn Borough Hall Farmers Market, where viewer questions will be answered in real-time by Top Chef’s Judge- Chef Acheson.   Twenty five farmers markets across the country will also be hosting Can-It-Forward Day celebrations, so check it out near where you live!  Also, don’t miss The Scoop tomorrow, because I’ll be giving away lots of goodies! 


The post Frozen Herb Starters appeared first on Our Best Bites.

Roasted Garden Tomato Sauce

$
0
0

Jar of Pasta Sauce from Our Best Bites intro Tomatoes, tomatoes.  August is when I typically have them going absolutely bonkers in the garden, but I’m also so busy with back to school stuff that I just don’t have time to do a giant canning project.  I like to do something with them so they don’t go bad so I often turn to roasting or freezing because it’s fairly quick and easy and it gives me lots of ways to use it a few days, weeks, or months down the road.  Since I know you will ask, no this is not a canning recipe.  It’s great to stock up on and store in the freezer, but if you want a recipe that has been tested for home canning, you’ll find my favorite, here.  For this recipe, I slow-roast tomatoes along with onions, garlic, and carrots.  All of those vegetables do magical things in the oven and the flavors intensify and sweeten into the most amazing sauce blend.

Garden Tomatoes

You can use any variety of tomato in this recipe, and you don’t need to peel them first, so it’s super simple

Continue reading: Roasted Garden Tomato Sauce

The post Roasted Garden Tomato Sauce appeared first on Our Best Bites.

Tangy Aioli

$
0
0

Miracle Whip+OBB Italicized - TOP logo 082714


Long-time readers know we love a good spread.  A Tangy Aoili from Our Best Bites intro flavorful Aioli is the perfect way to dress up things like sandwiches and sliders, burgers, crudites, grilled vegetables and more.  I love to whip up mixes like this and keep them in my fridge during the week.  We use them on everything from my lunch-time wrap to dinner on the patio.  This one is extra easy, and features one of our most favorite flavors: roasted garlic.

Start by roasting a head of garlic.  Just like in our tutorial, you’ll cut off the top of a whole clove of garlic, and drizzle the rest with a couple of teaspoons of olive oil.  (Roasted garlic with Garlic olive oil?  Yes please.)  Bundle it up in foil and pop it in your oven.

Roasting Garlic

Your house will smell amazing.  Cooking time depends on the size of your head of garlic.  I like to use a potholder or kitchen towel to gently squeeze, and when it’s soft to the touch it’s usually perfect.  If it still feels firm, it probably needs a little longer.   When it comes out, you’ll find the garlic cloves soft and golden caramel colored.  Once it’s cooled down, you can use your hands to gently squeeze the garlic right out.

Roasted Garlic

Since this is a tangy aioli, we’re using Miracle Whip dressing.  Mix the roasted garlic and Miracle Whip together, smashing the garlic cloves with a fork as you go.

Roasted Garlic and MW

Add a squeeze of fresh lemon juice (some of the zest would be a great addition, too!) and mix it all up.

Lemon Slices

That’s all there is to it!

MW Aoili Hrz

Use it to spread on sandwiches, or as a dip for grilled or fresh vegetables.  It adds a great tangy, garlicky taste to everything.

Tangy Aoili from Our Best Bites

You can keep this stored in your fridge for several days and use it in all sorts of ways.  Try it on a wrap, or in a chicken salad, too!

Miracle Whip Aioli
Recipe from Kraft

Ingredients
1 head garlic
1 teaspoon olive oil
1 cup Miracle Whip Dressing
2 teaspoons fresh lemon juice

Instructions
Heat oven to 400 degrees.  Cut a thin slice off the top of garlic head to expose tops of all cloves; drizzle with oil.  Wrap in foil.  Place on baking sheet.  Bake for 20 minutes, or until soft.  Cool 5 minutes.  Squeeze roasted garlic into a bowl with dressing and lemon juice and stir to combine.


Kraft Miracle Whip SPONSORED BY - Bottom Logo


The post Tangy Aioli appeared first on Our Best Bites.

Sweet & Smokey Coca-Cola BBQ Sauce

$
0
0

sweet and smokey coca-cola bbq sauce-3 square Once upon a time, I had this recipe for pork chops that you put in a baking dish and then topped with ketchup, some spices, and some Coke. Yes, it sounds kind of weird, but it was delicious. I mean, I was pregnant with my oldest son at the time, a time when food could taste more delicious and could taste more horrible than at any time ever, so I could be way off base. But I remember it being delicious.

I’m not sure what happened to that recipe, but I remembered it not too long ago when I had a craving for that sweet and tangy sauce that it was cooked in. After some light google stalking, I discovered that apparently this sauce thing isn’t so weird–it seems to be a staple, handed-down recipe in lots and lots of families and I had no idea it was a thing.

It’s funny that this is considered a recipe since it basically consists of other sauces all mixed together. But it’s not so funny once you’ve taken the 6-8 minutes it takes to make this sauce–it’s super serious. Like, the-most-delicicous-barbecue-sauce-recipe serious. I don’t jest about barbecue sauce.

You’re going to need 8 ounces of Coca-Cola, some ketchup, some Worcestershire sauce, liquid smoke, A-1 Sauce, onion powder, garlic powder, and freshly ground black pepper.

Coke, ketchup, A-1, onion powder, garlic powder, liquid smoke for Coca Cola BBQ Sauce

All you’ve gotta do is combine the ketchup, A-1, liquid smoke, Worcestershire sauce, garlic powder, onion powder, and pepper in a medium saucepan. Pop open the Coke (this is totally not sponsored, I’m just a sucker for drinks in adorable retro bottles)

Bottle of Coke for sweet and smokey cola BBQ sauce

in a 2-quart saucepan. Bring to a boil over medium heat, then reduce heat and simmer for 6-8 minutes or until slightly reduced. Remove from heat and allow to cool. Transfer to a storage or serving container and refrigerate until ready to use. Serve with pulled pork, shredded beef (like this leftover French Dip beef), chicken, drizzled on top of fire-roasted post trick-or-treating hot dogs, or ribs. This can be stored for several weeks. Makes 2 cups.

Bottle of Sweet and Smokey BBQ Sauce


The post Sweet & Smokey Coca-Cola BBQ Sauce appeared first on Our Best Bites.

How to make Homemade Nut Butter

$
0
0

Nut Butter IntroPremium nut butters are becoming more and more popular, and for good reason.  Freshly made butter tastes out-of-this-world amazing when compared to it’s pre-made, processed counterpart.  Fancy nut butters can also be incredibly expensive, but with a little  know-how (and the right tools), you can easily make these amazingly flavorful mixes at home.   A few weeks ago I posted this photo on Instagram, and it caused quite a stir!  The subject of my affection: This Designer Series Blendtec Blender.  In SEAFOAM.  Anyone who knows me knows that I loved this color long before it took over Pinterest.  We’ve talked so much over the years about things we love about our Blendtecs , but we’ve never actually posted about nut butter!  Let me just say first- if you want your dreams to come true and you’d like one of these bad boys delivered to your doorstep fo’ free, be here tomorrow.  On the Scoop.  Don’t claim we didn’t warn you.

Aqua Blendtec Designer Series

Choosing Nuts
You can use pretty much any variety of nuts to make nut butter.  Each variety yields a different flavor, and a different texture.  Nuts with higher oil contents, like macadamia nuts for example, will yield looser butters.  It’s really fun to experiment with different varieties, but it’s safe to say, that if you like a certain nut, you’ll probably like it in butter form!  This link is an awesome resource from Cooking Light that gives a general description for different nuts and the type of butter they yield.

Prepping Nuts
I always always toast my nuts before making butter with them.  You might prefer the flavor of a raw nut, but I’ve never made a nut better that didn’t taste better when the nuts were toasted first.  To roast at home, roughly chop your nuts and spread out on a baking sheet.  Bake in a 400 degree oven until golden brown. You can usually smell them when they’re just right.  Cooking time really depends on the variety so just keep an eye on them.

My local Fred Meyer (Kroger) sells roughly chopped, toasted nuts in the bulk section that are literally labeled “Almond Butter”.  They’re a great deal, so it makes it quick and easy!

Roasted Almonds

The Blendtec has a Twister Jar  (there’s also a mini Twister Jar option) that is specifically made for making things like nut butter.  It makes it SO easy.  If you don’t have a high-powered blender like a Blendtec, you can use a food processor.  The amount of nuts you use is going to be dependent on the container you’re working with.  I really love my  Twister jar because I can make nut butter with as little as a cup of nuts, or up to 2-3 cups.  If you have a large food processor, you’ll need enough nuts that they can fully process in there.

Roasted Almonds in Blendtec

As you start blending, the nuts go through 3 phases.  In this photo below, I’m making cashew butter, and I’ve added a fresh vanilla bean to it, which is why you’ll see little dark specks.  First, they become finely chopped, almost like a powder:

Nut Butter Stage 1

As the oils release, they start to have a paste-like consistency, like a really thick peanut butter dough:

Nut Butter Stage 2

Then finally as all of the oils are released, they transform into this smooth, creamy, in some cases pourable mixture:

Nut Butter Stage 3

Now with a food processor, you sometimes have to be patient for that process to happen.  Depending on the nut variety, and the volume, they can turn to butter quickly, or other times take up to 15 minutes or so.

One thing that’s especially awesome about a Blendtec is that it happens fast.  Like, really fast.  I timed it.

Stopwatch

Less that 30 seconds, not bad.

Sweeteners
When you’re making your own nut butter, you can choose how and to what level, you sweeten it.  Kate had a great idea she shared on Instagram recently, where she just processes a can of honey roasted peanuts.  Brilliant!  If you want to control sweetness a little more,  just add your own to taste.  Granulated sugar is always a good bet.  I like to use dark brown sugar for a delicious warm sweetness.  You can also use honey, or my favorite: pure maple syrup.  Add your sweetener (and salt, if you like) at the very end.

Sweeteners

One thing I’ve learned about liquid sweeteners, honey in particular, is that it often changes the consistency of the nut butter.  Generally it causes it to immediately thicken (which can in some cases be a good thing.)  Because of this, I recommend stirring in a little honey by hand to a spoonful of your butter in a separate little bowl, just to make sure the consistency is okay, and then go ahead with the whole batch.

Honey in Cashew Butter

Flavors
You can also add spices and seasonings to your butter.  One of my favorite things to add is vanilla bean paste. I also almost always add a little cinnamon.  This one pictured below is Maple Vanilla Almond Butter and it’s amaaazing.  You can also experiment with cocoa powder and even melted chocolate.  Have you all seen our recipe for Homemade Nutella?  You’re basically just combining homemade hazelnut butter with melted chocolate, cream, and butter.  Can’t go wrong with that.

Almond Butter

(I did not notice until just now- but look at that above photo.  Doesn’t it look like a little almond butter man lying face first waist-up in a puddle of almond butter??  Like he tried so hard to get out and just gave up.  Sorry little dude.)  Have fun playing around with seasonings.  Pecan butter is out of this world when sweetened with maple syrup, and spiced up with cinnamon, cloves, and a little nutmeg.  You can also play around with savory seasonings like curry, chili, and cumin.  Savory nut butters work beautifully in Thai dishes like peanut noodles or satays.

And of course sweet butters are killer on toast, waffles and pancakes, swirled in oatmeal, on a sandwich, or even mixed into ice cream.

How to Make Nut Butter from Our Best Bites


Now, I definitely want you all to enjoy the beautiful world that is nut butter, and what better way to do it than with a brand spankin’ new Designer Series Blendtec Blender??  I’m going to make you be a little patient though, so you have to wait until tomorrow.  Actually, it will be live on the Scoop tonight at midnight.  Set an reminder on your phone for tomorrow so you don’t forget to come back and enter!

And let me know if you have a favorite nut butter combo!


The post How to make Homemade Nut Butter appeared first on Our Best Bites.

Lightened-Up Cheese Sauce

$
0
0


lightened up cheese sauce squareOne of my most favorite things in the whole entire world is cheese sauce. Over noodles (I’d way rather have it drizzled on top of pasta than mixed together), over veggies (just about any vegetable is edible with cheese sauce and mu children agree), with tortilla chips (do I really need to explain?) My conundrum with cheese sauce is that a) I don’t love “cheese product” and b) it’s rarely healthy eating-friendly.

Well.

This sauce has made my life. I got the recipe from America’s Test Kitchen Comfort Food Makeoversbut I made a few very minor tweaks, all relating to the cheese (because, well, cheese). The original recipe called for low-fat cheddar cheese, and not too much of it. One thing I’ve found in my most recent weight-loss journey is that it is no longer 1990 and dietary fat isn’t the enemy (in most cases), not really. I’ve had much, much more success when I cut down on refined carbs and sugars and don’t worry so much about the fat. It makes our food taste good and, when paired with protein, it helps signal our brains when we’re full.

So.

I went for the full-fat cheese and I also increased it a little. It still comes in at a very respectable 125 calories–If you have 1 cup of steamed broccoli topped with 1/4 of this sauce, you’ve got a 150-calorie mid-afternoon snack.

You’re going to need chicken broth, a tiny pinch of cayenne pepper, cornstarch, a little Dijon mustard, some light cream cheese, and 1 cup (4 ounces) of freshly shredded medium or sharp cheddar. Medium or sharp because you’ll get more flavor by using less, and freshly shredded (instead of a bag of pre-shredded cheese) because they coat the shreds with a chemical that results in a weird texture when you try to melt it.

lightened up cheese sauce-1

In a small saucepan, combine 3/4 cup chicken broth and the cayenne pepper. Bring to a boil. While the broth is heating, whisk together the remaining 1/4 cup broth, cornstarch, and the Dijon mustard. When it comes to a boil, add the cornstarch mixture and boil for about 1 minute or until thickened. Turn heat to low and whisk in the light cream cheese. When totally smooth, whisk in the cheddar cheese. Drizzle over steamed or roasted vegetables,

lightened up cheese sauce-3

zoodles, cooked pasta, baked potatoes, or use it as a dip for chips or like fondue. Makes 4-6 servings.

lightened up cheese sauce-4 copy

P.S. If you haven’t heart, people are getting their cookbooks THIS WEEK!! EEEK! I don’t think they’re on too many shelves yet, but you can order it from Amazon, Barnes and Noble, Deseret Book, or your favorite independent bookseller.

400 Calories or Less Cover

ALSO.

Our olive oil sale ends TODAY! So head over to the shop and use the code LUCKY to get 15% off your order!

Lucky

The post Lightened-Up Cheese Sauce appeared first on Our Best Bites.


Fluffy Raspberry-Lemon Honey Butter

$
0
0

lemon raspberry honey butter squareEaster is almost here and most of you probably already have your menus planned, but the last-minute addition is so easy and so delicious that it’s totally worth adding it to your plans!

I got this honey butter recipe from my next-door neighbor back in our newlywed, pre-kids, college years. I can’t remember her name for the life of me, but if you lived on the top floor of Grandview Manor in Provo, Utah sometime between 2002 and 2004 and gave me your honey butter recipe, this one goes out to you.

I added some lemon zest and raspberries because I feel like lemon and raspberries are made for each other and that raspberries and honey are made for each other. You wind up with the fluffy, light-as-air, almost ice-cream-y raspberry honey butter that’s perfect for spreading on rolls, challah, cornbread, pancakes, waffles, scones, (so pretty much anything from our breads or breakfast departments), your finger…

To get started, you’ll need a cup of salted butter, 1/2 cup of honey, 1/4 cup of marshmallow creme, 3/4 cup raspberries, and a medium lemon.

lemon raspberry honey butter-1


P


Place the butter and honey in a large bowl (or the bowl of a stand mixer fitted with the wire whisk)

lemon raspberry honey butter-3


Add 1/4 cup marshmallow creme.

lemon raspberry honey butter-4


Beat with an electric mixer on high for 1-2 minutes or until very light and fluffy. Add the zest of 1 medium lemon (if you don’t have a microplane zester, you need one

lemon raspberry honey butter-5

and 3/4 cup fresh raspberries, washed and patted dry (a lot of excess moisture will make it hard for the raspberries to combine with the butter).

lemon raspberry honey butter-2

Continue to whip until the raspberries are broken down and thoroughly combined. Serve at at room temperature. Makes about 2 1/2 cups.

Whipped Lemon Raspberry Honey Butter from Our Best Bites


The post Fluffy Raspberry-Lemon Honey Butter appeared first on Our Best Bites.

Mango Avocado Salad

$
0
0

avacado mango salad square So Sara and I have always said that we could sit down with a bowl of pico de gallo and eat it with a spoon. Which is generally considered socially unacceptable (kind of like how eating plain Greek yogurt out of the container is so hiptrendycoolhealthy, but eating plain sour cream is something Homer Simpson would do. Even if they taste pretty much the same.)

Well.

I’ve discovered the way to escape this is to call it a salad, maybe after putting it into a cute cocktail glass. Tomato-cilantro-jalapeno salad, with a light lime juice dressing. Mango Avocado Salad. See? Bon appétit!

(And really, this is a delicious, healthy way to pack in fresh fruit and healthy fats–if you want to add a little more bulk to your snack or side dish, toss in some rinsed black beans, and if you’re fancying some meat, try it on top of grilled or fried fish tacos, grilled flank steak, grilled chicken, or try the Honey-Lime shrimp in our new book.)

For this mango avocado salad recipe, you’re going to start with 2 mangoes, 2 avocados, and 1/2 of a red onion.

avacado mango salad-1

If you need help figuring out how in the heck to work that mango or the avocado, check out our mango and avocado tutorials.

Immediately before serving, toss together the mango, avocado, and red onion.

avacado mango salad-2

Whisk together some extra-virgin olive oil, lime juice, and balsamic vinegar. I can hear you–”Ew, balsamic vinegar! No, Kate!” you say. I promise, it’s delicious; the balsamic is naturally sweet and fruity, so it complements these flavors nicely (although it will discolor your mangoes and avocados, so prepare yourself emotionally.)

avacado mango salad-5

I used our orange olive oil and our raspberry balsamic vinegar,

avacado mango salad-3

but you could use so many flavored olive oils–chili, lime, even garlic–or just plain extra-virgin olive oil and regular balsamic vinegar. Drizzle this over the mango mixture. Season to taste with salt and serve immediately, either as a salad or as a salsa (this is delicious over fish tacos or grilled steak or chicken).

Avocado Mango Salad from Our Best Bites


The post Mango Avocado Salad appeared first on Our Best Bites.

Basil Vinaigrette

$
0
0

We’ve talked before about how one of the fundamental differences between Sara and me is that Sara is amazing when it comes to plants. Growing them. Loving them. Making sure they don’t die. I, on the other hand, am the worst. I killed my little tabletop succulent garden. The only reason my landscaping survives is because it has a sprinkler system and we get a lot of rain in Louisiana and when they planted everything. I gave them explicit instructions to plant only what was next-to-impossible to kill. In the plant world, my house is referred to as “Kate’s House: Where Vegetation Goes to Die.”

That said, my herbs never die. Which makes them my favorite plants. Things got a little touch and go after my German Shepherd ripped up my rosemary plant (he only goes for the rosemary…weird dog), but some little root of it survived and out popped some rosemary a few weeks later.

My herbs (basil, rosemary, and mint) are all planted in pots on my back deck and they have dried out by the end of August, they have been left for dead in the snow, they have had water flowing out of them during the spring monsoon season, and they still come back, every year, regardless of what the weather (or my dog) has in store for them. They are my very best plant friends. Yes, I do realize that someone could use that quote when they try to commit me.

 So not only do I have basil growing prolifically in one of my pots, but when I went to take some family pictures for some friends the other night, she brought me a big water bottle full of basil.basil vinaigrette-1

But I figure you can never have too much because soon summer will be over and we’ll be forced to use dry basil or spend $3.99 on one of those tiny packets of fresh basil at the store, so I’ll take all the basil now, please.

This basil vinaigrette is light and refreshing, kind of like pesto for your salad (minus the pine nuts.) I’m using our garlic olive oil,

basil vinaigrette-3

but lemon, chili, regular, or any combination would also be fantastic. I love it just as a salad dressing on a regular salad or drizzled over fresh tomatoes and fresh mozzarella (kind of like a slightly reimagined caprese), pasta salad, or as a marinade for chicken, fish, or flank steak.

To start, place a couple of cloves of garlic in the jar of your blender or food processor and give it a few pulses to chop it up. Then pack in two cups of basil leaves…

basil vinaigrette-1

and add some white wine vinegar,

basil vinaigrette-2

lemon juice, red pepper flakes, and some olive oil.

basil vinaigrette-4

Pulse in the blender until the desired consistency is reached. You want it to be liquidy like a salad dressing, but you don’t want to completely pulverize the basil–you still want some texture from it. This makes about 1 cup of dressing.

basil vinaigrette-5 copy

Basil Vinaigrette
Yields 1
Light and fresh and perfect for drizzling over fresh tomatoes and fresh mozzarella, your favorite salad, or as a marinade for chicken, flank steak, or fish.
Write a review
Print
Prep Time
5 min
Prep Time
5 min
Ingredients
  1. 4 cloves garlic
  2. 2 cups packed fresh basil leaves
  3. Juice of 1 lemon
  4. 1/4 cup white wine vinegar
  5. 1 cup extra virgin olive oil
  6. 1/4 teaspoon red pepper flakes
  7. Kosher salt and freshly ground black pepper to taste
Instructions
  1. Place the garlic in the jar of your blender and pulse a few times to mince the garlic. Add the basil, lemon juice, vinegar, olive oil, and red pepper flakes and pulse until a dressing consistency is formed (but it isn't completely smooth--you still want some texture from the basil. Season to taste with kosher salt and freshly ground black pepper.
Notes
  1. I used our garlic olive oil, but lemon, chili, or regular olive oil, or any combination would be fantastic
Adapted from Food & Wine
Our Best Bites http://ourbestbites.com/


The post Basil Vinaigrette appeared first on Our Best Bites.

Creamy Feta and Dill Salad Dressing

$
0
0

One of my very most favorite things is creamy Greek-ish dill dip and salad dressing. Whether I’m using it as a salad dressing or a dip, it’s a nice alternative to Ranch. But they can be hard to find or really expensive if you buy them in the produce section or kind of chemical-tasting if you buy them near the salad dressings. So I decided to make my own, and it’s been a staple in our refrigerator for the last few weeks. It’s seriously so easy–just a few minutes with regular pantry and refrigerator ingredients (you might not have kefir on hand…but we’ll talk about that in a second and why I have some in my fridge all the time, and not because I’m über-crunchy, or even really very crunchy at all.)

For dry ingredients, you’ll need some garlic powder, onion powder, kosher salt, a little black pepper, and some dill weed.

untitled-2

And then you’ll need a handful of refrigerated ingredients–mayonnaise (light mayo is great. Also, a lot of people ask and Sara and I are die-hard Hellman’s/Best Foods only kind of girls. It’s a hill to die on.), crumbled feta cheese, and plain kefir (or buttermilk, but we’re getting to that).

untitled-5

What is kefir? It’s a cultured dairy product, lots and lots of probiotics in one place. Kind of like strong yogurt drink.  A lot of times, it’s flavored (like strawberry kefir.) Why kefir? It’s kind of a long and interesting story. Actually, it’s not that long or really all that interesting. Basically, the grocery store I find myself in most frequently only sells buttermilk in quarts. I like to have buttermilk on hand, but I can rarely use it all before it goes bad and I promise, if it goes into my freezer, it’s not coming out until 3 years later when I clean out my freezer and find it buried under a bag of fish fillets and chia seeds and other foods I bought with  really good intentions (while those Outshine coconut bars and Talenti gelato mysteriously disappear within days).

So anyway. One day, my store was out of the quarts of buttermilk and I had some serious buttermilk syrup needs, which I feel like needs real buttermilk, not the milk-and-lemon juice substitute. So I saw the plain kefir, and although I was a kefir virgin (drinking my yogurt gives me the heebie jeebies), I knew enough about it to think it was a reasonable substitute for buttermilk. Turns out it tastes JUST like buttermilk, with the added benefit of all those probiotics and, because of them, it lasts forever; when I buy it, the expiration date is usually about 2 months out, and it’s good until then, no matter when you open it (this is not a sponsored post about kefir, by the way, I just found all of this information fascinating). So I can have a bottle of it in my fridge all the time without the overwhelming pressure to buttermilk all the things in my house before it goes bad. And that’s why it’s now one of my refrigerator staples. 

Aaaaaanywaaay. 

In a container or jar, add all your ingredients except for the feta.

untitled-7

Whisk it all together (if you love this whisk, you can find it in our shop…that I am shamelessly plugging.)

untitled-9

Fold in the feta cheese and then let it hang out in the refrigerator for about an hour before serving.

untitled-14

This makes a little over 1 cup of dressing.

Creamy Feta and Dill Salad Dressing
Yields 1
Write a review
Print
Prep Time
5 min
Total Time
5 min
Prep Time
5 min
Total Time
5 min
Ingredients
  1. 1/2 cup mayonnaise (light is fine)
  2. 2/3 cup plain kefir or buttermilk
  3. 1/2 teaspoon garlic powder
  4. 1/2 teaspoon onion powder
  5. 1/2 heaping teaspoon kosher salt
  6. black pepper to taste
  7. 1/2 teaspoon dill weed
  8. 1/3 cup crumbled feta cheese
Instructions
  1. Whisk together mayonnaise, kefir, garlic powder, onion powder, salt, black pepper, and dill weed. Add feta and refrigerate for at least an hour before serving. Serve on top of salad or as a dip.
Our Best Bites http://ourbestbites.com/

The post Creamy Feta and Dill Salad Dressing appeared first on Our Best Bites.

Quick Candied Nuts

$
0
0

I have a quick little Friday tutorial for ya today.  Candied nuts are a fantastic addition to savory dishes like salads, and desserts, like piled on a cheesecake or ice cream sundae.  There are lots of ways to candy, or caramelize nuts.  One of my favorite versions is found in this old blog post.  That method involves melting butter, brown sugar, and corn syrup and then baking your nuts in the oven or in a pan.  It creates an amazing toasted nut with a sweet, buttery, caramel-y coating.  This method is much simpler, with just 2 ingredients, and it takes less than 5 minutes to finish!  It’s a great method to use when you need them quick and light, or simply just want to make a few.

How to easily make candied nuts

Continue reading: Quick Candied Nuts

The post Quick Candied Nuts appeared first on Our Best Bites.

Mango Pineapple Salsa: canned or fresh

$
0
0

 Happy hump day!  You’ve made it half way through the week, congratulations.  You probably deserve a cookie or something.  Before I get to today’s recipe, I have an announcement for my Idaho friends.  I’ll be setting up shop at a local boutique this Thursday, Friday, and Saturday.  Our awesome Olive Oil line will be for sale (and sampling!) as well as tote bags, cook books and TONS of baked goods.  We’re talking Salted Caramel Dark Chocolate Popcorn, Apple Cider Caramel and Pumpkin Spice Caramels, Jumbo Fudge Brownie S’mores Cookies, Freeze-Dried Mallows, and so much more.  Head toward the kitchen island to find my stuff!  These boutiques happen a few times a year (follow their Facebook page to know when and where), and it’s not one of those awkward things where vendors are sitting there trying to sell their stuff.  It’s set up like a store where you can just go browse from tons of awesome local artisans in food, crafts, clothing, home decor, and more.  It’s in the Foxtail neighborhood, which is so new it won’t show up on maps.  It’s off Chinden between Linder and Meridian, just East of Fred Meyer.  Just follow the signs from there!  (Utah, we’re coming to you soon, too!)boise boutique

 Now- salsa!  I am in love with small batch canning.  I don’t do the whole 97-pints-at-a-time thing.  I love making small batches that don’t trash my kitchen and don’t take all day.  And salsa canning is  just about as easy as it comes.  All you need is a pot of boiling water to seal the jars!  Read more about canning, and how to get started, here.

I saw this recipe for Mango-Pineapple Salsa and it had my name all over it. 

Canned Mango Pineapple SalsaContinue reading: Mango Pineapple Salsa: canned or fresh

The post Mango Pineapple Salsa: canned or fresh appeared first on Our Best Bites.

Cantina-Style Salsa

$
0
0

I have a deep and abiding weakness for chips and salsa. If I’m going to fall off the healthy eating wagon, it’s going to be while I’m firmly grasping a bag of tortilla chips. We don’t have great Mexican food in my particular neck of the Louisiana woods, so I could dream dreams of street tacos and fish tacos and burritos, but when push comes to shove and I finally find myself with some good Mexican food, it all comes down to the chips and salsa. 

Well. I’m not really on the chips right now. But the salsa? Yes, please. I still love it–on eggs, omelets, tacos, salads, fajitas, black beans. If I can put salsa on it, you can bet that I’ll be putting this salsa on it. 

I started making this salsa when my husband and I were in college, dead broke, when fresh produce was a luxury and Mexican restaurants were a distant dream. You know that fancy salsa in the plastic tubs at the grocery store? This is kind of like that. Only it tastes way better. And it’s significantly cheaper, especially since you probably have most of the ingredients in your cupboards and your fridge.

Cantina-Style Salsa from Our Best Bites

You’re going to need two cans of stewed tomatoes (yes, stewed tomatoes–they’re not just for your grandma anymore), half a red onion, a couple cloves of garlic, some kosher salt, a handful of cilantro, and a big, juicy lime. My lime was feeling shy and didn’t make it into the picture, but it definitely made it into my salsa because lime juice. You’re also going to need Chipotle Tabasco Sauce (I know, I had Tabasco in my last recipe, too. Apparently when I’m eating healthy, I need a wide variety of spicy condiments in my life.) More about the Tabasco in a minute.

Cantina-Style Salsa

Place the tomatoes, juice and everything, in the jar of a blender. Add a teaspoon of kosher salt.

Cantina-Style Salsa-2

Add the onion and garlic (you don’t even need to chop ’em first)…

Cantina-Style Salsa-3

Add a handful of cilantro (about 1/2 cup).

Cantina-Style Salsa-4

Pulse the mixture in the blender until the onion is roughly chopped.

Now…about adding some heat.  I’ve tried all the things to spice up this salsa–fresh peppers (like jalapeños), cayenne pepper, chipotle chili powder–and this is hands-down my favorite.

Cantina-Style Salsa-5

It adds a little heat and a lot of flavor. Jalapeños are fickle–it can be difficult to tell how much heat you’re adding (or not adding) and sometimes they leave a weird aftertaste. Cayenne is dependable heat-wise but doesn’t add much in terms of flavor. But this? It’s smoky. It’s tangy. It’s spicy, but not nearly as spicy as traditional Tabasco sauce. So give it a few good shakes, pulse it again, have a taste, and then add more as needed.

And that’s it. It takes 5 minutes and it’s so delicious and is something you can basically eat in unlimited amounts. 

Cantina-Style Salsa from Our Best Bites

Speaking of blenders…we may or may not be giving away a BlendTec blender in our DietBet that’s going on right now! If you’ve been on the fence about joining, the blender is basically telling you that you need to do this!

Cantina-Style Salsa
Yields 4
Make cantina-style salsa at home in just a few minutes with refrigerator and pantry staples!
Write a review
Print
Prep Time
5 min
Total Time
5 min
Prep Time
5 min
Total Time
5 min
Ingredients
  1. 2 14.5-ounce cans stewed tomatoes
  2. 1/2 red onion
  3. 2 cloves garlic
  4. Juice of 1 lime
  5. 1 handful cilantro (about 1/2 cup)
  6. 1 teaspoon kosher salt
  7. Chipotle Tabasco Sauce (amount varies depending on heat preference)
Instructions
  1. Place all ingredients except the Tabasco in a blender. Pulse until the ingredients are chopped but not pureed. Add Tabasco sauce to taste. For best flavor, refrigerate at least 2-3 hours before serving.
Our Best Bites http://ourbestbites.com/

The post Cantina-Style Salsa appeared first on Our Best Bites.


Blackberry Maple Syrup

$
0
0

When we do pancakes at our house, I usually ask my kids if they want fruity or syrupy.  I’ll do butter and jam, fresh fruit, or a fruit sauce, OR go traditional with butter and maple syrup.  I have one kid that when given choices, almost always says “both!”  Because why choose one when you can slather everything on?  He also usually wants to keep up with his big brothers and have about twice as big of a serving size as I know he can handle, but I usually go with it because I secretly want to have an excuse to finish off a giant plate of everything-0n-it-pancakes when I have told myself ten times I was going to stick only to my protein shake.  

I always finish the pancakes.

Blackberry Maple Syrup

The other day I as I mopped up the pools of maple syrup with giant berries, I realized he was onto something.  The warm maple notes combined with bright fresh berries was uniquely delicious.  We love making fruit sauces around here, and really a good fruit sauce is mostly fruit and sugar, so I decided to use maple syrup instead.

Blackberry Maple Syrup

You’ll need 12 ounces of blackberries- which is 2 of those little clamshells, or a heaping two cups if you’re lucky enough to live somewhere like the northwest where no one in their right mind actually purchases blackberries at the store, but instead pulls over to the side of the road and picks them.  

Blackberry Maple Syrup

Put them in a small sauce pan and add about a cup of maple syrup.  I’m using 100% pure maple syrup, the good stuff.

Blackberry Maple Syrup

Let it simmer away on the stove for about 15 minutes.  The berries will let out a lot of moisture, so we’re letting some of that evaporate to thicken the sauce.  While it’s simmering, use a fork or the back of a spoon to smash the berries around a bit. 

Blackberry Maple Syrup

This part is optional, but I also add a hit of our Blackberry Balsamic Vinegar.  ANY of our four balsamics would be fabulous here.  It deepens the flavor and adds a little tang that balances out the sweet syrup.

Blackberry Maple Syrup

I find I need to thicken it up a little bit as well, so I add a little cornstarch slurry right at the end to thicken to a good syrup consistency.

Blackberry Maple Syrup

This is awesome on french toast, but I was too lazy to make french toast for this post (not too lazy to combine pancake mix + water) but also great on pancakes, waffles, and definitely ice cream!  

Blackberry Maple Syrup

In fact, we took this left over sauce and popped it in the blender with some vanilla bean ice cream and made the most amazing milkshake.  Pin this one so next time you end up with some juicy fresh berries, you can whip it up!

Blackberry Maple Syrup from Our Best Bites

Blackberry Maple Syrup
A fruity twist on classic maple syrup, perfect on french toast, waffles, pancakes, and ice cream!
Write a review
Print
Ingredients
  1. 12 ounces blackberries (heaping 2 cups)
  2. 1 cup pure maple syrup
  3. 2 teaspoons Blackberry Balsamic (optional)
  4. 3 teaspoons cornstarch
Instructions
  1. Place blackberries and maple syrup in a small sauce pan and bring to a boil. Reduce heat to simmer and cook for about 15 minutes, occasionally breaking up berries with the back of a fork.
  2. Combine cornstarch with 2 teaspoons cold water and stir to dissolve. Add cornstarch slurry to pot, along with balsamic, and simmer for about a minute to thicken. Remove from heat and cool to luke warm and serve.
Our Best Bites http://ourbestbites.com/

The post Blackberry Maple Syrup appeared first on Our Best Bites.

Blueberry Salsa

$
0
0

So I have a little confession to make: I hate grocery shopping. I hate the list-making and the meal-planning and the fridge-cleaning-outing and the actual act of grocery shopping and the money-spending (it all feels so futile when my kids would happily subsist on Ramen noodles and Dum Dums) and the loading and the unloading, all so I can put it all away and then clean up once all the cooking is done. If I ever find myself in a position where I can hire a personal assistant, said personal assistant will be solely responsible for figuring all this stuff out (and figuring out a way to clean the blinds that doesn’t make me want to cause myself or someone else bodily harm.) 

Sometimes I find myself with all sorts of odds and ends in the refrigerator that need to be used up–chicken and blueberries and jalapeños and onions a cilantro (and three cartons of eggs, because apparently every time I go to the store, I grab a carton of eggs, a bag of powdered sugar, and a can of sweetened condensed milk because subconsciously those are the things I can’t live without. What does this say about me?!)

So when I was scrambling for something to make for dinner one night, I remembered Sara’s Cranberry Salsa and realized I could do something similar with the blueberries. And it. Was. Delicious. Whether you’re making it as a snack (like with chips and salsa or on top of cream cheese and crackers) or adding it to a meal (it’s incredible on marinated and grilled chicken), it’s a great way to use up summer produce (and eat delicious things.)

Blueberry Salsa from Our Best Bites

You’re going to need a pint of blueberries, a little bit of minced red onion, a jalapeño (seeded and minced), some cilantro, the juice of a lime, salt to taste, and, if you want, a little bit of sugar.

Blueberry Salsa

Roughly chop the blueberries and add them to a small mixing bowl. Add some minced onion and jalapeño.

Blueberry Salsa-2

Juice the lime over the ingredients and add some salt to taste.

Blueberry Salsa-3

If you want to add a little sugar, feel free. I won’t judge.

Serve immediately with chips and salsa, over marinated and grilled meat (chicken is great), or spread a cracker with cream cheese or goat cheese and top with a spoonful of this salsa.

Blueberry Salsa-4

Blueberry Salsa from Our Best Bites

Blueberry Salsa
Yields 2
A unique and flavorful twist on summer flavors! Perfect for spooning over grilled chicken or finishing off a cream cheese-topped cracker.
Write a review
Print
Prep Time
5 min
Prep Time
5 min
Ingredients
  1. 1 pint blueberries, coarsely chopped
  2. 1/4 cup minced red onion
  3. 1/4-1/3 cup chopped cilantro
  4. 1 jalapeño, seeded and chopped
  5. Juice of 1 lime
  6. Salt to taste
  7. 1 teaspoon sugar (optional)
Instructions
  1. Toss ingredients together in a small mixing bowl. Serve over grilled meat, with tortilla chips, or spread crackers (like Ritz Crackers) with cream cheese and top with a spoonful of blueberry salsa.
Our Best Bites http://ourbestbites.com/

The post Blueberry Salsa appeared first on Our Best Bites.

Raspberry Chocolate Jam

$
0
0

Yes.  You read that correctly.  Someone’s about to put choc-o-late all up in your jam!

Raspberry Chocolate Jam

It’s your basic fresh raspberry jam, with just a hint of bittersweet chocolate that makes the most amazing, rich, complex jam I’ve ever had.  Honestly one of the best things I’ve made in a while, and it’s SO easy!  This isn’t a canning recipe (in terms of long-term storage), so all of you non-canners stay with me!  It just makes one batch, about 2 cups, of the most amazing sweet chocolate-kissed jam you’ve ever tasted.  This stuff is fantastic on all of the usual subjects like toast, waffles, pancakes, french toast, and the like.  But it’s also spectacular on crackers with a creamy cheese or used as a cake filling, or mixed with vanilla ice cream and a splash of cream in the blender (just did that one last night).  And it looks darling and so special all tied up with a bow for gifting.  If you’ve never made jam before, this couldn’t be easier. 

Raspberry Chocolate Jam You just need a pound of fresh raspberries. 

Raspberry Chocolate Jam

Which you will combine with a little lemon juice and plenty of sugar.

Raspberry Chocolate Jam

As the sugar melts and the berries release their juices, you’ll get a beautiful liquid which will boil away for a few minutes. 

Raspberry Chocolate Jam

Then you add 2 ounces of bittersweet chocolate.  Don’t try adding milk or dark or anything else.  Bittersweet is the perfect match for both flavor and consistency.  The brand that works the very best here is Ghirardelli.  I just used the chocolate chips so I didn’t even have to chop it up.

Raspberry Chocolate Jam

The way you’ll test to see if this is done is by dropping a spoonful onto a chilled plate  When you can leave a track mark after running your fingers through it, it’s done!   It only takes a few minutes.

Raspberry Chocolate Jam

Then pour it into jars.  It makes about 2 cups so you can get a couple of larger jars, or 4-5 little ones.

Raspberry Chocolate Jam

The color is a deep crimson and so gorgeous.  It looks like ordinary berry jam, and then you taste it and the chocolate comes right at ya. (I’m eating it here on these amazing Cathead Biscuits).

Raspberry Chocolate Jam

This is something really nice to gift (if you can part with any of it!) But it does make enough to keep a jar and share a jar.  If you do share it in a mason jar, just make sure people know to keep it refrigerated and that it’s not actually canned/shelf stable.

Raspberry Chocolate Jam

I bet this would be really great with blackberries as well, I might try that next!

Raspberry Chocolate Jam
This quick and easy jam is rich and complex in flavor. Fresh rasperries and the perfect amount of chocolate is delicious on toast, waffles, cake filling, pancakes, french toast, scones, or on crackers with a soft cheese.
Write a review
Print
Ingredients
  1. 1 pound (3 1/4 cups) raspberries
  2. 1 1/2 cups sugar
  3. 1 1/2 teaspoons bottled lemon juice
  4. 2 ounces bittersweet chocolate, chopped
Instructions
  1. Place 2 small plates in freezer to chill. In large saucepan, bring raspberries, sugar, and lemon juice to a boil, stirring often, over medium-high heat. Boil until raspberries have broken down and released their jices, about minutes.
  2. Whisk in chocolate until completely melted, about 1 minute. Continue to boil mixture, stirring and adjusting heat as needed, until thickened and registers 217-220 degrees, about 3-5 minutes (FYI mine took much longer than that to reach temperature). Remove pot from heat.
  3. To test consistency, place 1 teaspoon jam on chilled plate and freeze for 2 minutes. Drag your finger through the jam on plate' jam has correct consistency when your finger leaves distinct trail. If runny, return pot to heat and simmer for 1-3 minutes longer before retesting
  4. Meanwhile, place two 1-cup jars in a bowl and place under hot running water until heated through, 1-2 minutes. Shake dry.
  5. Using funnel and ladle, portion hot jam into hot jars. Let cool to room temperature, cover and refrigerate until jam is set; 12-24 hours. Jam can be refrigerated for up to 2 months.
Notes
  1. This jam is not suitable for canning, it is only meant to be stored, refrigerated, in jars. Can be frozen for several months though!
Our Best Bites http://ourbestbites.com/
This recipe comes from the book Foolproof Preserving, by America’s Test Kitchen.  This isn’t a sponsored post, I just genuinely love this book.  It has so many good, solid, basic canning and preserving recipes, along with really unique twists, like this one.  And it’s all small batch preserving- the only kind I do!  You don’t need tons of equipment or produce; it’s all about just making a few jars at a time.  Super easy and manageable.  If you’re looking for a great book on this topic, I recommend this one!  Another one of my favorites, also focusing on small-batch canning, is Food in Jars by Marisa McClellan.  You can see more of our preserving recipes in our index, here!

Preserving Books

You can follow me on Instagram to see more of what I’m preserving these days.  Last night I got a crazy huge load of peaches from my Dad’s tree, so I’m all about the peach this week!

Sara with Peaches


The post Raspberry Chocolate Jam appeared first on Our Best Bites.

Lightened-Up Cheese Sauce

$
0
0
Lightened-Up Cheese Sauce

  One of my most favorite things in the whole entire world is cheese sauce. Over noodles (I’d way rather have it drizzled on top of pasta than mixed together), over veggies (just about any vegetable is edible with cheese sauce and mu children agree), with tortilla chips (do I really need to explain?) My...

The post Lightened-Up Cheese Sauce appeared first on Our Best Bites.

Garlic-Parmesan Compound Butter

$
0
0
Garlic-Parmesan Compound Butter

We have a lot of compound butters on the blog–on the sweet side, we have this orange-berry butter, maple cinnamon butter and THE BEST honey butter you’ll ever have in your life, and on the savory there’s this garlic butter with lemon and feta and jalapeño-lime butter. But I realized we don’t have a simple garlic butter...

The post Garlic-Parmesan Compound Butter appeared first on Our Best Bites.

Viewing all 66 articles
Browse latest View live


Latest Images